A long time ago in a galaxy far, far away… a little robot arrives to restoring balance to the force.
This post shows how to build a replica of the famous r2d2, fully controllable. Throughout the paper we will talk about the design used, the electronic components needed, a summary of the assembly, a brief description of how it has been programmed and finally we will include some video demos of the final result.
The design
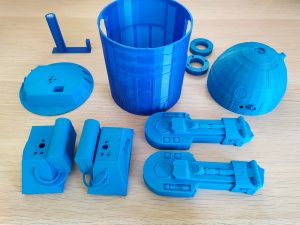 The full chassis of the robot has been printed in 3D pieces. The original design of the printable parts is from ChaosCore Tech. However, all the motion system has been redesigned to avoid the transmission system based on shafts and gears. The new feet design host directly the continuous rotation servos and the wheels, and the wires run inside the legs to the body where the electronics are housed.
Also the support of the head servo was redesign (instead of the old one which hosted the continuous rotation servos, now in the feet), and also support the electronics.
List of the printable parts of the chassis:
- 2 r2d2 legs
- 2 rd2d side feet
- 2 r2d2 leg connector
- 1 r2d2 central foot
- 1 r2d2 central foot connector
- 1 r2d2 body
- 1 r2d2 head
- 1 r2d2 butt plate
- 1 r2d2 head support
 With all the chassis printed we proceed to the painting. It was first given a full coat of primer paint, to improve the adhesion of the acrylic paint, and to obtain the colour base of the robot (the characteristic white for the body, and the metal grey for the head).
After that, the rest of shapes and details were painted with a brush and acrylic paint imitating the original design of the movies. Finally, to prevent external damages to the paint, the DYOR was given a vanish coat.
Hardware and electronics
The movement of R2D2 is achieved by two wheels driven by continuously rotating servos, and a central free wheel. Another servo will be in charge of the rotation of the head. The robot also has an ultrasonic sensor to detect objects in front of it, and a bluetooth module to interact with a cell phone. It also integrates a buzzer to play sounds and an RGB LED.
Complete list of hardware and electronics:
- 2 continuous rotation servos FS90R
- 2 FS90R wheels
- 1 free wheel
- 1 Arduino Nano v3.0
- 1 I/O Extension shield
- 1 ultrasound sensor HC-SR04
- 1 buzzer KY-006
- 1 bluetooth module SPP-C
- 1 powerbank
- 3 220 ohm resistors
- 1 RGB led
- Extension wires
- M3/M4 nuts and screws
Assembly
For the assembly, we have used M3 and M4 screws and nuts, superglue, solder and soldering iron, and other necessary tools such as screwdrivers, wrenches, …

First all the necessary electronics were connected and tested. The servo wires had to be cut and re-soldered to be able to pass through the inner hole of the legs. Moreover, we had soldier resistors between the wires and the rgb led.
Secondly, all the nuts we superglued into place. And once have been fixed, the different parts were joined with M3 screws. The free wheel requires M4 screws to attach it to the central foot, while the servos+wheel uses M2 to attach it to the lateral feet.
Next, the electronics board was screwed into the designed bracket, and the bracket was attached to the central body, carefully placing the various cables, to make good use of the little space available. The servo and the head connector are finally placed. And the rgb led and the ultrasonic sensor are inserted in their corresponding holes.
Lastly, we have place the powerbank in a hole, and connect it to the electronics whenever we wish to operate the robot. In addition to the former we closed the robot by screwing the head to connect it with an M3 screw. And here is R2D2!

Programing
To program the robot, we have used the Arduino IDE, and the App Inventor environment to design the interface and remote control by mobile phone using Bluetooth communication.
The main objective, was to connect the Arduino controller and the mobile phone, make possible the transmission of orders sent by the app to the robot. Basically, the programing task can be separate in two mayor problems. On the one hand, the development of the application so that it is able to connect and transmit the instructions to the robot (using App Inventor). On the other hand, develop the main program using the arduino language in order to perform the necessary actions based on the instructions received.
The principle program is divided into three foundamental routines:
- Remote control using the mobile interface.
- Autonomous obstacle avoidance routine, in which R2D2 will move forward until it locates an object in its path, whom it avoids by turning and continuing to move forward in a free direction.
- Autonomous tracking routine, in which it will try to maintain a fixed distance from the object in front of it, following it as it advances.
The application has a simple operation. Once you are connected to the robot, each button in the interface send a different command (simply a different ASCI character), to the arduino, who will interpret it appropriately. The upper-left buttons allow the connection/disconnection with the robot via bluetooth. With the lower buttons we select the routine we want. The rest of the buttons on the central panel allow us to control the remote mode, move the robot, turn its head, change the color of the rgb, make R2D2 “talk”, or play one of the original songs of Star Wars.
The Arduino program will first establish bluetooth communication with the phone and continuously receive the command issued by the application. A first control structure will select the operation mode, which will be changing when the corresponding command is received.
In remote control mode, it will wait until it receives a command, and then it will perform the action associated with that character, such as moving the servos, changing the rgb color or emitting sound.
In auto mode, the program will toggle between three states, pause, move forward or rotate. At first it will move forward, but if it detects an obstacle within its range of action, it will pause the movement, and then turn until it stops detecting collisions, and moving forward again.
In follow mode, R2D2 will advance forward maintaining a fixed distance to the object it detects ahead. If it is too far away from that target distance it will increase its forward speed to reach it. In this way it will follow its target as it moves.
Demos
In this final section we include some video demostration of the three differents routines.
Autor
Jorge López Gamarra

